Showing posts with label city living. Show all posts

Wednesday, May 8, 2013

Taking Donations to a Thrift Store Without a Car


City life without a car means you have to haul it yourself. This is what I do to take donations to a thrift store. I load up one of my giant IKEA bags. Carry it half a mile to the train in the morning with me. Carry it another half a mile to my school and take it to the nearby thrift store on my lunch break. It's a work out! I'm lucky I work close to a thrift store because I don't have any donation drop off points close enough to my home to walk.

Yes, I've tried calling Salvation army for a pick up, but the first time was a Saturday and I stayed home and waited for a call to come open the back door. They never called, so I called and they said not all drivers have phones but I can leave it outside on the day of a pick up. So, next time I left stuff in the alley with a big sign that it was for Salvation Army. This time they did call and I told them where it was, but only one thing of the four I left was still there. So, now I schlep it on the train one load at a time.


Wednesday, April 17, 2013

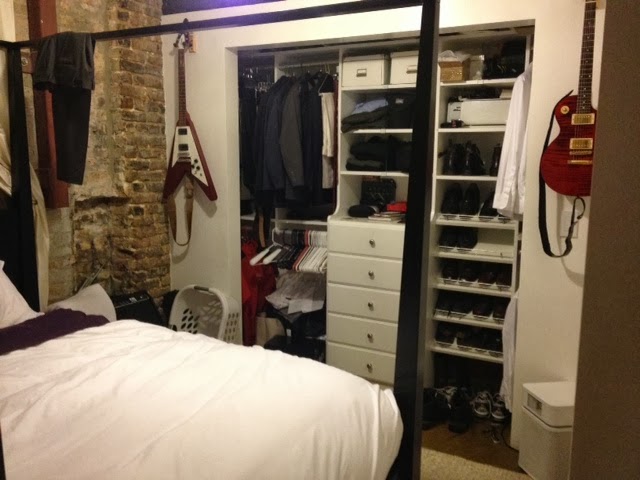
Home Tour

Got my loft ready for a condo board meeting and took some pictures after. You can tell we need more lighting and we have a few other changes planned for the near future.


Entry


Kitchen


Entering second bedroom area

(eventually will put a door here)


Second Bedroom


 Living Space

We keep flip flopping where the dining table goes, sometimes it's in this corner, but not this time


Master Bedroom


Bathroom


Thursday, September 6, 2012

An Elegant Evening Out

My husband and I recently enjoyed a magical evening at the Chicago in White event (inspired by Diner en Blanc). An elegant picnic where everyone wears all white, brings along their own table, and dances to a live jazz band under the stars. The fun part is you don't know where you are going till you meet up with your group.

I made my own white wrap skirt out of a beautiful white satin with a silver brocade design. The simple tablescape included elements from my wedding (the small white vase and the LED light inside it). We ate our gourmet food from Whole Foods off real china and drank from real glasses. To start off the dinner, everyone twirls their white fabric napkins in the air.

The Meet-up

Before the train got more crowded

The table and you can kind of see my skirt


Waving napkins

Tuck in

Everyone puts their tables together in a row, like one long banquet table

Surrounded by city and siting by the river at the Merchandise Mart

Wednesday, June 13, 2012

DIY: Custom Copper Curtain Rods

Living in an industrial space brings ups challenges when decorating your home. We decided for not just aesthetic reasons, but also for better energy efficiency that we needed drapes. We picked out beautiful champagne/mushroom (nice neutral) colored curtains with a great raw texture to them. The color really complements the brick it's against and blends nicely. We didn't want a color that screamed, "Hello you have lots of fabric over here!" These curtains also have blackout lining that helps to significantly block the heat from the afternoon sun.

We decided to mike some out of plumber's pipe to get that industrial feel. Because we were making them ourselves, we spent the extra money to upgrade to copper pipe. My husband just LOVES copper; I think it's because it matches his hair. On our trip to HD, we got funny looks from the people in the plumbing section. I guess where we live, people don't do DIY projects like this with unconventional materials. Finally the guy figured out what we needed a showed us to the adapter that connects copper pipe to a floor flange. We found out copper pipe that says 1/2" is different than 1/2" steel pipe and you need an adapter to bridge the gap since floor flanges are sized to the steel pipe. Because of the amount of stuff we were getting, I caved and signed up for the HD card. With our savings, we only spent around $120 on all the pipe and fittings for two 8' and one 4' wide windows. That doesn't include the pipe cutter at $11 and the hammer drill my husband ended up buying to drill into the impossibly hard concrete. I did the measuring and marking, he did the drilling. I cut the pipe (once I got the pipe cutter, before it was him with the Dremel) and polished everything with Barkeepers Friend.

Supplies:
3 - 10 foot copper pipes, 3/4 inch, Blue type (meaning sturdier)
8 - Floor Flanges for 1/2" pipe
8 - 3/4" to 1/2" copper adapter with threading (not sure of technical term)
6 - Elbow joints
2 - T joints
Screws (get appropriate mountings for your walls, in our case masonry screws)
Pipe cutter
Barkeepers Friend
Drill and bits
Measuring tape


My Dremel is in the shot because initially we used it to cut the pipe. It's fine if you only have one window and only a few cuts to make. Way too time consuming for more. So after first small window was completed, I went and bought a pipe cutter. Worth it! The adapters I was talking about are in the foreground between the screws and drill bits.


Installing the flange, the adapter, short pipe, and elbow. Great thing about copper is you don't have to thread the pipe. It just slides right into the fittings. We didn't even solder or anything so we can still take the curtain down, but everything holds together without it.


Cutting with Dremel and polishing. Wear gloves and read directions.


Final pictures. They are a little dark because it was night when we finished and we still need to get more lighting for our place. In the pictures, the curtains almost look pinkish, but trust me, in real life they are not at all.

So in the end, I have converted my husband into a man who wants to figure out how to make something instead of buying it. Finally! Now he wants to tackle all kinds of other things and loves the feeling of a power tool in his hand!


Little story about getting all this home without a car:

We walked to our local HD. We're lucky we have one just over a mile away. We picked out all our supplies and then I waited outside the entrance with our big cart while my husband went to the corner to try to flag down an appropriately sized taxi. After about 10 min with no luck, I called my favorite cab company. They said it would be a hour! So I called another. They said I would get a call when one was on the way. Fifteen more minutes went by with no call. Finally a Scion cab came and was dropping off a passenger. After a little convincing on my husbands part, the driver and he tried to fit the 10' pipes in diagonally from the corner of the windshield on the passenger side to the back corner of the trunk. The trunk closed with not a millimeter to spare! Once we were all inside and on our way, the cab company called with  an automated message that our cab was there. Gee Thanks! 


Tuesday, June 5, 2012

Weekend Street Fair and 2nd Bedroom Sneak Peak

I went to one of Chicago's summer street fairs this past weekend. I just love summer in this city. Each neighborhood will host it's own festival one weekend of summer. This one was in Wicker Park. One of the most memorable things I saw was this beautiful booth. Not only was the handmade jewelry pretty, but the booth itself had a great set up. It has inspired me to make more jewelry!


 I just love the natural stone!


Here's a sneak peak at what's been going on in the second bedroom! (by no means a finished and staged shot) It's still a work in progress. Whenever you reorganize all your clothes, things have to get messier before they get cleaner.

This work surface was created using our two file cabinets and the door to the laundry closet that we have removed. Like many second bedrooms, ours is filled with mismatched furniture. I'm going to be sewing in here this summer, so I need a big clean space. All I did was re-purpose furniture we already had and used some textbooks to even it out. (The grey cabinet is a bit shorter.) This project was free! It also makes the room feel bigger for some reason; I think it's the long white surface that unifies the pieces into one.

Notice the black frames above? That's one of my eco-friendly, DIY, cost saving projects. I had white frames from our wedding and one other, so I painted them black (artist paint and brush, I can't spray paint in Chicago). Then I scanned pictures I had used previously for my "family wall" and sent them to Walgreens to print out black and white. Plus, I ordered a few wedding pictures in black and white as well. Because they were all just 5x7, I went for symmetry, something I've avoided in the past. It took lots of measuring, a little math, and a level to get them up. But now the small frames seem to function as one larger piece. The total cost of this project was free for the frames and only about $8 for the 5x7 BW enlargements.


Related Posts Plugin for WordPress, Blogger...